I did some stupid math in a spreadsheet to place the string slots in the nut for my upcoming 8-string bass. Any constructive input is appreciated.
https://docs.google.com/spreadsheets/d/1KGS_eoy8JUUH_VKmlBYA5T5jHmtdW9s9ESHW9HvVpGg/edit?usp=sharing


Programming, etc
I did some stupid math in a spreadsheet to place the string slots in the nut for my upcoming 8-string bass. Any constructive input is appreciated.
https://docs.google.com/spreadsheets/d/1KGS_eoy8JUUH_VKmlBYA5T5jHmtdW9s9ESHW9HvVpGg/edit?usp=sharing
An article on Steve’s Internet Guide got me thinking about MQTT when on the road. No, seriously! Here’s my situation:
I have a sensor that reports the usual temperature and humidity inside my travel trailer, and it also provides the same information from inside the RV refrigerator thanks to a Ruuvi tag placed within. (Code for this sensor using ESPHome can be found in my Github repo.)
This sensor connects to my home WiFi network when the trailer is parked in the driveway, but obviously not when we are on a trip. We can use the Ruuvi app to read the fridge temperature using BLE when inside the unit, but if we are even across the campsite or farther away – no go.
Anyone who has relied on an RV refrigerator to keep their food safe knows that they can be less than reliable. Knowing the temperature is rising gives us a chance to take action before food items are spoiled.
My goal with this project was to provide a way to monitor the refrigerator temperature when the trailer is parked away from home, and to use Home Assistant to issue alerts that will inform us of any temperature issues.
Before I get into the MQTT configuration, let’s make sure we connect to WiFi when away. My trailer has a travel router that can bridge to RV park networks, a hotspot, or a tethered smartphone to bring Internet access inside. ESPHome allows one to set up more than one set of WiFi options, so I use this code:
wifi:
networks:
  - ssid: !secret rv_ssid
    password: !secret rv_password
  - ssid:  !secret wifi_iot_ssid
    password: !secret wifi_iot_password
    manual_ip:
      static_ip: $ip_address
      gateway: 192.168.37.1
      subnet: 255.255.255.0
      dns1: 8.8.8.8
      dns2: 1.1.1.1
On the home network I use a static IP address to make connection time fast. This, along with deep sleep, helps limit the time the device is awake when using a battery operated-sensor.
In order to collect the telemetry data from this sensor when away, I set up a free account with the service flespi. However, one can use any one of many services offering an MQTT broker service, as my solution is simple and standards-based. Thanks to the good folks at flespi for making this service available for trials and hobbyists.
Flespi assigns a long token for authentication, and this can be provided as either a username or password when logging in. Here is my code:
  mqtt:
    id: mqtt_client
    broker: !secret flespi_broker
    port: !secret flespi_port
    username: !secret flespi_token
    birth_message:
      topic: $device_name/birthdisable
      payload: disable
    will_message:
      topic: $device_name/willdisable
      payload: disable
(Sorry for all the secrets; gotta keep things private and portable)
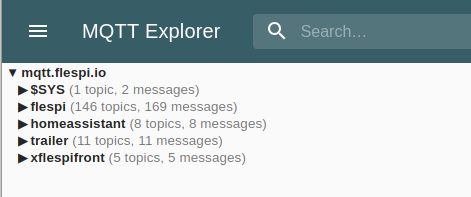
MQTT Explorer shows the broker contents once the device is connected and transmitting.
Finally, we need to make a safe connection between the local broker and the public one. I use the Mosquitto broker locally, and it offers an MQTT bridge functionality that makes this task easy.
What we are going to do is have the local broker subscribe to the topics created on the external broker. In my example, the sensor uses topics with the prefix “trailer/”. In addition, ESPHome uses a topic prefix to send configuration information to Home Assistant. The default topic for this is “homeassistant/”.
To define these subscriptions, we will modify the mosquitto.conf file to connect to the external broker and subscribe. Add this code to your file:
#  Bridge to public broker

connection <MQTT connection name>
address <broker url or IP with port number, such as example.com:1883>
remote_username <use your token here>
bridge_insecure false
try_private false
bridge_protocol_version mqttv50

topic homeassistant/# in 0
topic trailer/# in 0
The top section of this snippet sets up the broker to broker connection. Your version may be different if using another service. Note that I am using an unsecured connection; you may wish to beef things up.
The lower section is what defines the subscriptions. The topic “homeassistant/#” uses the octothorpe wild card symbol to grab anything under this topic prefix. The configuration information for the sensor is found here.
The “trailer/#” topic is used to identify the sensor readings. Whenever something is posted to this topic prefix, it will be retrieved through the bridge to the local broker – ready for consumption by Home Assistant or any other user.
I was surprised that I could do this without any additional cost and limited coding. Now that the data is feeding to Home Assistant, I can write automations, alerts, etc. to keep us informed.
Thanks again to Steve of Steve’s Internet Guide for the inspiration and examples.
My first rule of home automation is not to ask why I need something automated, but if it is possible. It’s a hobby after all. However, with the garage door we had an actual need. (Plus, I could do it!)
The whole point of having a garage door is so we can close it when access isn’t needed. Otherwise there would just be a hole in the wall. However, in my house we have this bad habit of not closing it – sometimes when we are home and sometimes when we leave. This project was inspired by an all night “open to all” garage.
There were also a couple of articles that outlined how this could be done:
Wifi Garage Door Controller using a Wemos D1 Mini (I pulled much of my code from this project)
Open the Garage Door with a Phone and Particle Core | Make
UPDATE: I’ve replaced the Magnetic Reed Switch with a much hardier commercial model. The Enforcer works much better!
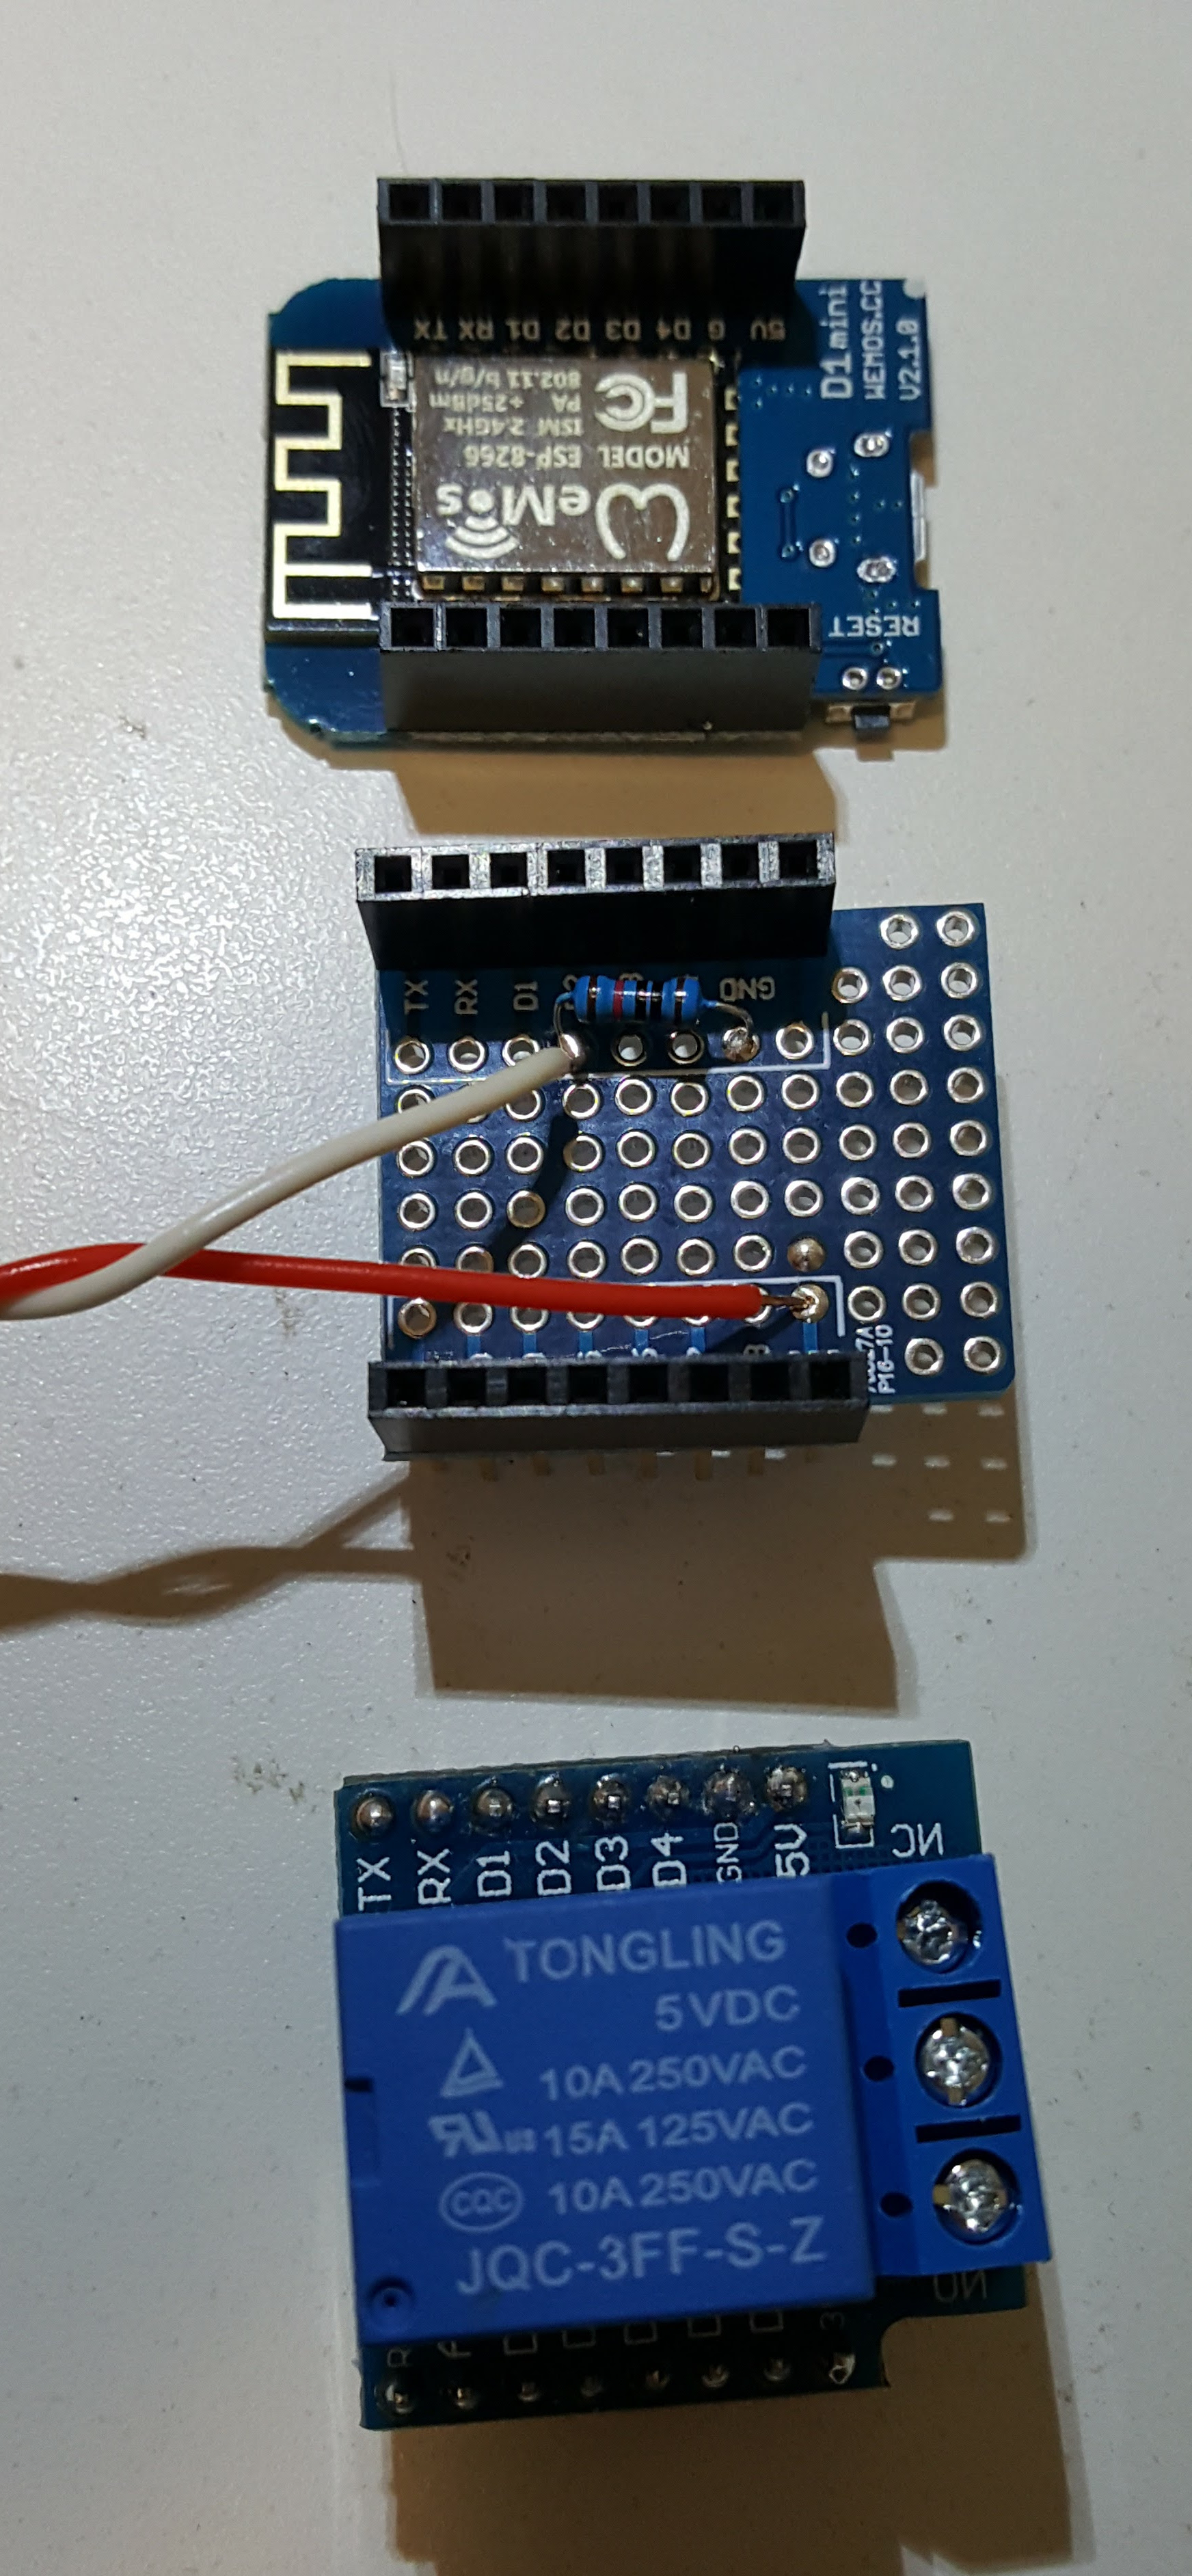
One could substitute other WiFi enabled project boards, such as the Node MCU. I used the Wemos partly because of the availability of the shields which make for a compact build. The ProtoBoard shield was not required, but helped me get past my substandard soldering skills.
I don’t usually solder all of the pins on the D1 shields; just those that are needed. However, there is no penalty for completeness. Be sure all of the pins listed above are soldered in all headers.
This code is doing three things each cycle through the loop. First, it checks the state of the door and reports any changes. Next, the temperature and pressure are checked and reported. Finally, the client loop will look for any commands from MQTT and handle accordingly.
The code is available on GitHub: https://github.com/dashdrum/garage_door
If the door is found to be open, it is not reported right away. Instead a counter is incremented, and only after five consecutive readings of open is that status returned. The goal here is to ignore spurious readings.
A return value of closed is assumed correct and set on first reading.
A change in the door status is immediately reported via MQTT. The process also reports the status each minute regardless of a change to ensure Home Assistant is always in sync.
This code is based on the example program that came with the library by github user mahfuz195 (found here). The readings are returned in JSON format using a library by github user bblanchon (found here)
Updates are limited to once every 10 minutes. No need to overwhelm Home Assistant with readings.
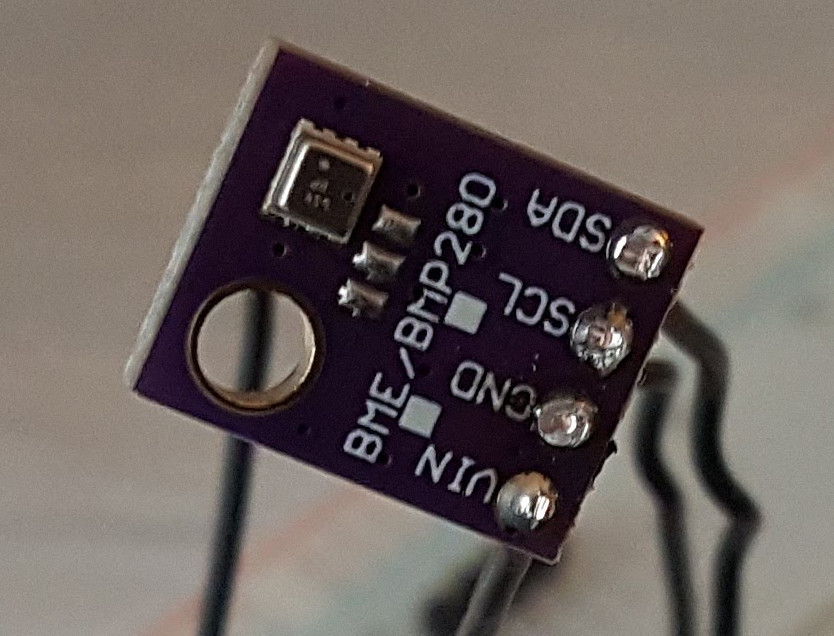
In the begin() function for the BMP, I specify which pins to use for the I2C interface. On the D1 Mini these default to D1 and D2, but those pins were already in use by the relay and reed swtich. D5 and D6 are recruited to take the job.
The callback routine catches a MQTT message. The payload of “OPEN” is the only command that will “push” the button – closing the realy for 6/10 of a second.
I’m using a few other libraries in this program. WiFiManager handles the WiFi connection, storing the credentials in nonvolitile memory. It is important to note that WiFiManager will open a WiFi acces point if no credentials are found or the connection attempt fails. Connect to this AP using a laptop or phone, access 192.168.4.1, and follow on the onscreen instructions to setup your WiFi information.
ESP8266HTTPUpdateServer accepts program updates over the air. No need to climb up a ladder to connect your laptop!

Using a bell wire pair, connect one wire to the 3.3V pin, and the other to D2. Also, I’ve added a pull-down resistor between D2 and ground. The pull-down keeps the signal from “floating” (sending an unknown level). On the other end, use the NO (normally open) terminal for one wire and the common terminal for the other.

Connect the four pins of the BMP280 sensor as labeled. Rember that my code uses D5 and D6 for SDA and SCL, not the defaults of D1 and D2.
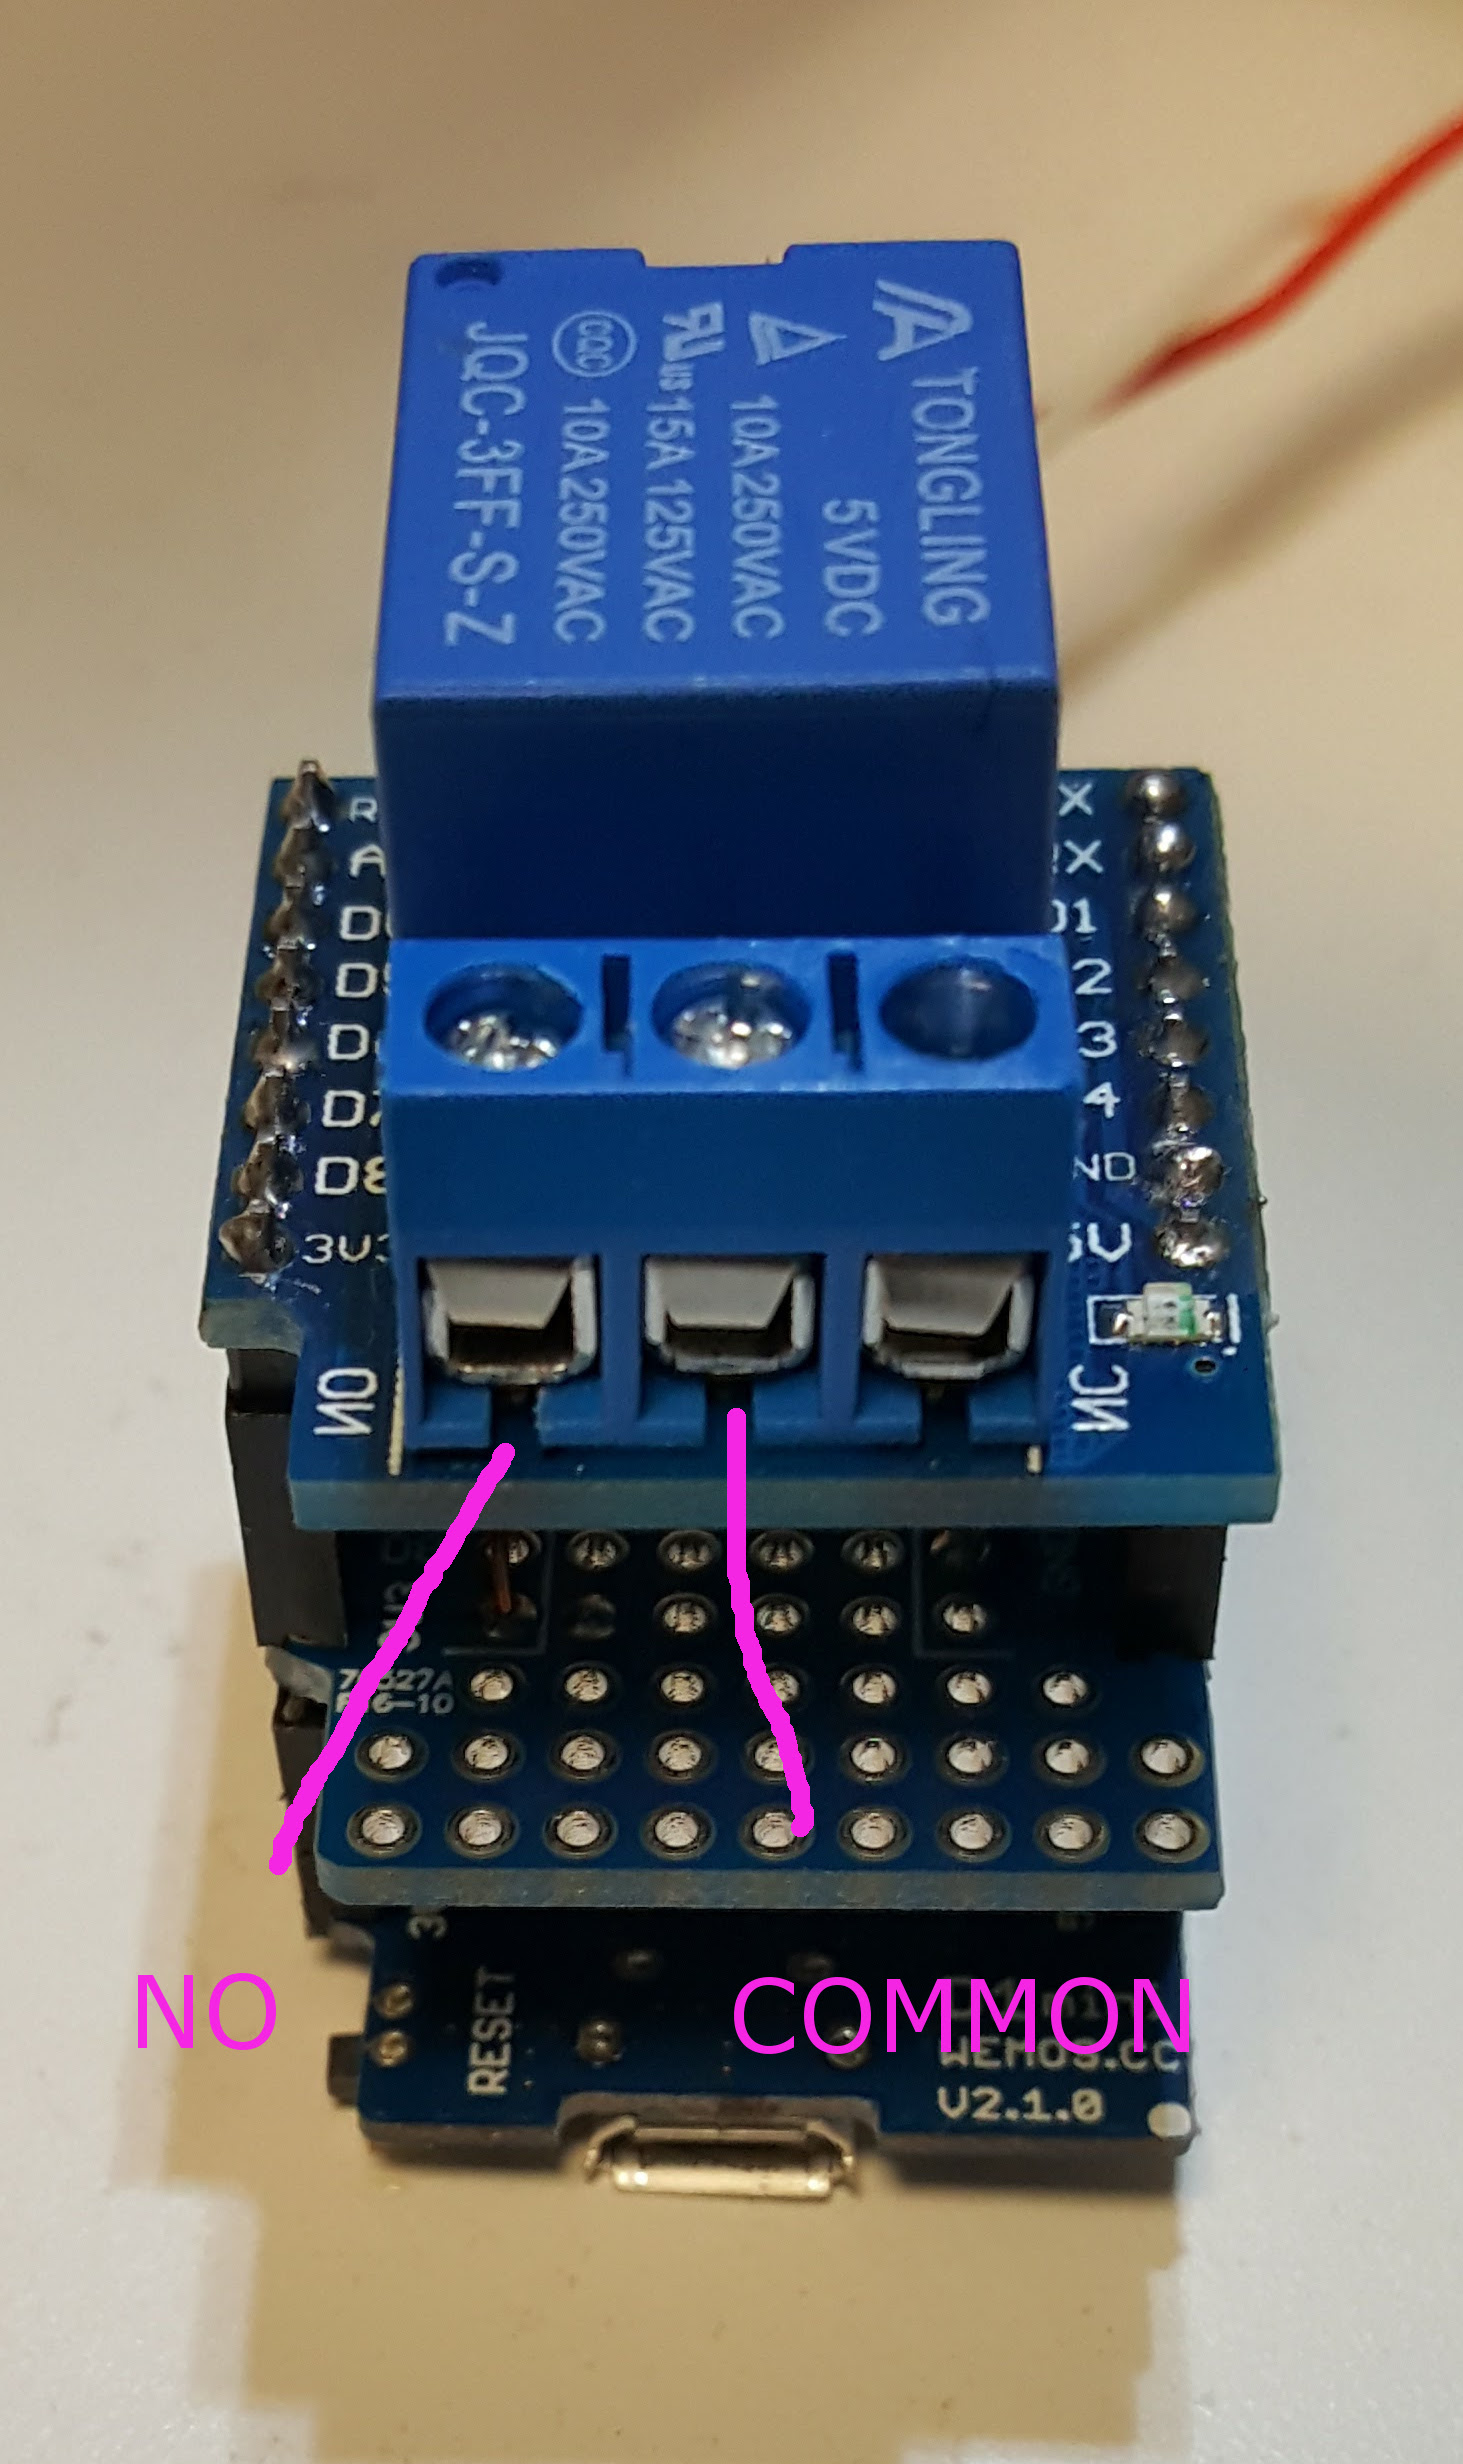
Your garage door opener should have at least four terminals – two for the open button and two for the safety circuit. Follow the wires from your open button to find the two you need. Otherwise, use a short piece of wire to short the pairs of terminals together until the door opens.
Run a pair of bell wire from the opener terminals to the relay. Use the common terminal and the NO terminal on the relay.
The GitHub repository includes a configuration file for Home Assistant. Integrate these entries into your configuration.yaml file. Note that this file itself is not a complete configuration file.

Once again the GitHub address is: https://github.com/dashdrum/garage_door
Please leave your questions or suggestions below.
I used the pico_django version of Mini Django, from Github user Tim Watts, to deploy a quickie XML feed today. Fun!
Thanks, Tim!!
 I can find many examples of using Django, Gunicorn, and Nginx for an application, and also ways to implement HTTPS on Nginx, but not all together. This post will document my final configurations and explain my decisions.
worker_processes  auto;

events {
    worker_connections  1024;
}


http {
    include       mime.types;
    default_type  application/octet-stream;
    sendfile        on;
    keepalive_timeout  65;

    ## Rewrite http to https

    server {
        listen 80 default_server;
        listen [::]:80 default_server;
        server_name _;
        return 301 https://$host$request_uri;
    }

    ## Use https

    server {
        add_header Strict-Transport-Security "max-age=63072000; includeSubdomains; ";

        listen              443 ssl;
        server_name         your.domain.xxx;
        ssl_certificate     <path-to-certificate>;
        ssl_certificate_key <path-to-private-key>;
        ssl_protocols       TLSv1 TLSv1.1 TLSv1.2;
        ssl_ciphers         HIGH:!aNULL:!MD5;

        location = /favicon.ico { access_log off; log_not_found off; }


        location / {
            proxy_set_header Host               $host;
            proxy_set_header X-Real-IP          $remote_addr;
            proxy_set_header X-Forwarded-For    $proxy_add_x_forwarded_for;
            proxy_set_header X-Forwarded-Host   $host:443;
            proxy_set_header X-Forwarded-Server $host;
            proxy_set_header X-Forwarded-Port   443;
            proxy_set_header X-Forwarded-Proto  https;
            proxy_read_timeout 300s;
            proxy_pass http://localhost:8000;
        }
    }
}##bind = ":8000"
workers = 3
timeout = 300
proc_name = "dupe"
user = "<your user>"
group = "<your group>"
raw_env = []
capture_output = True
loglevel = "debug"
errorlog = "<path-and-name-for-log-file>"[Unit]
Description=gunicorn daemon
After=network.target
[Service]
Environment=DJANGO_DEBUG=False
Environment=DJANGO_SECRET_KEY=<your SECRET_KEY>
Environment=DJANGO_ALLOWED_HOSTS=[*]
Environment=DJANGO_STATIC_ROOT=<application.path>/staticfiles
Environment=DJANGO_SETTINGS_MODULE=<project>.settings.devl
User=<your user>
Group=<your group>
WorkingDirectory=<application.path>
ExecStart=<virtualenv.path>/bin/gunicorn -c <application.path>/gunicorn.py --bind 0.0.0.0:8000 <project>.wsgi:application
[Install]
WantedBy=multi-user.targetThe first server section grabs any http traffic coming in on port 80 and redirects it to the https URL on port 443.
Handling https traffic was trickier. We need to pass all of the header settings from the incoming request on to gunicorn/Django at localhost. All of the proxy-set attribute values in the location section came from a little bit of trial and error.
The setting for proxy-read-timeout is admittedly high – five minutes! This application has one longer running transaction that was exceeding the 60 second default. This value needs to match the timeout setting in the gunicorn settings. I’ll probably lower it to a more respectable two minutes before hitting production.
Finally, astute readers will notice that there is no code to handle requests for static resources. This is because I am using Whitenoise to route those calls through Django. This works only because my app just has eight users and Django can handle the load. Anything that is public facing should use Nginx to serve static files directly (or look into using a CDN, etc.)
I’m using 3 workers – plenty for my expected load. The timeout is set to 300 seconds, which is the same found in nginx.conf above. These should match.
The bind setting is commented and moved to gunicorn.service so that I can use this file for more than one instance of the application. A second service file can specify a unique port for its copy of gunicorn.
Since my app is stored in a git repo (on a company server, not github), I don’t want to include any security information like the SECRET_KEY in a versioned file. Therefore, this guy is not included there – although an example file is.
The Environment variables set here are read by Django at startup.
The ExecStart line starts by running the version of gunicorn found in the virtualenv for this instance. Setting up a virtualenv is beyond this scope of this post, but I hope that if you’ve gotten this far you know all about them.
Note that the bind parameter includes the port number used for this instance of gunicorn as mentioned above.
I hope this helps someone setting up a Django app. Please drop a note in the comments with your experience. I’d also invite questions, as well as comments on how I can improve my configuration. Thanks all!
![]() (Another post written for personal documentation)
(Another post written for personal documentation)
Download these three packages from Oracle for the proper operating system (32 bit for me):
Unzip and copy to /opt/oracle/11_2/instantclient
Create /etc/ld.so.conf.d/oracle_instantclient.conf:
#Oracle client LD_LIBRARY_PATH setting
/opt/oracle/11_2/instantclient
Update cache:
sudo ldconfig -v
ln -s libclntsh.so.10.1 libclntsh.so
export ORACLE_HOME=/opt/oracle/11_2/instantclient
The library is called cx-oracle. Use your favorite installation method. (Don’t forget about your virtual environment!)
Hope I remembered everything.
Found another post that outlines the procedure maybe a little better than I did, and includes notes on setting up tnsnames.ora. See Install Oracle Instant Client 11.1 and cx_Oracle 4.4 on Ubuntu 8.04 on Technoblog.
![]() Last night, Dreamhost moved my account to a new host. Not a big deal, and it’s certainly understandable, but it did break my one running Django app – the Gentryart Gallery. Here’s what I did to fix it.
Last night, Dreamhost moved my account to a new host. Not a big deal, and it’s certainly understandable, but it did break my one running Django app – the Gentryart Gallery. Here’s what I did to fix it.
First, as suggested in the Dreamhost Server Moves Page, I recompiled Python to create a 64bit version. While I was at it, I upgraded from v2.5.2 to v2.6.5. This great page by Ryan Kanno outlined the steps. I just changed the version number. I also deleted my old installation of Python so there wouldn’t be any chance of confusion there.
Now, if I would have used the same python version and kept everything in the same locations, I would have been done. Since I didn’t, I had a little more to do.
Next, I needed to install all of the python packages I use. Here’s the list:
Following the famous Jeff Croft post, I updated the admin_media shortcut to point to the new Django files.
And the gallery is back in business!
The Django application I’m developing has a reporting need: paper (PDF) output of reports, both 8 1/2 X 11 and special forms (labels, name tags, etc.). So, I’ve begun evaluating my reporting options.
Unfortunately, I haven’t found very many methods to examine, probably because of my requirements:
Looking through Google searches, I’ve found that the terms “reports” and “reporting” can mean different things to different people. Since I’m looking to generate paper, I have been looking at Geraldo, which uses the ReportLab library to generate PDF output. This application looks promising, but is still a work in progress. I’m finding that flexible formatting with variable length text is a difficult, and maybe impossible, thing to do.
I’d like to hear from others on this subject. Have you found a good package for reporting? Are you developing one? Please leave your thoughts in the comments.
(This is a ‘Note to Self’ post)
I’ve been trying for half the day to get radio buttons in a custom template to work. The buttons are generated in a for loop that builds a table row for each choice (iterating over a queryset called cls), including this code for the row’s radio button:
input type="radio" name="reg_choice_1" value="{{ cls.id }}"
 {% ifequal srform.reg_choice_1 cls.id %}CHECKED{% endifequal %}
The goal is to have the ifequal test tell me if the row’s cls.id matches the value set in the form. However, I didn’t know how to access that value. After many Google searches, perusal of the Django documentation, and even a failed attempt to follow the template rendering code, I was stumped. As a wild guess, I tried the .data attribute, and it worked! Here’s the updated (and functional) code:
input type="radio" name="reg_choice_1" value="{{ cls.id }}"
{% ifequal srform.reg_choice_1.data cls.id %}CHECKED{% endifequal %}
I hope that I’ve put enough keywords in this post so that future stumped Djangonauts can find some help.
As always, leave your comments below.